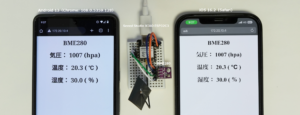
「XIAO ESP32C3をWeb(WiFi)サーバにして気圧・温湿度センサBME280の測定データをスマートフォンのブラウザに表示」の記事では、同じWiFiアクセスポイント配下で使うという制約はありますが、ワイヤレスで測定中のデータをモニタリングできました。
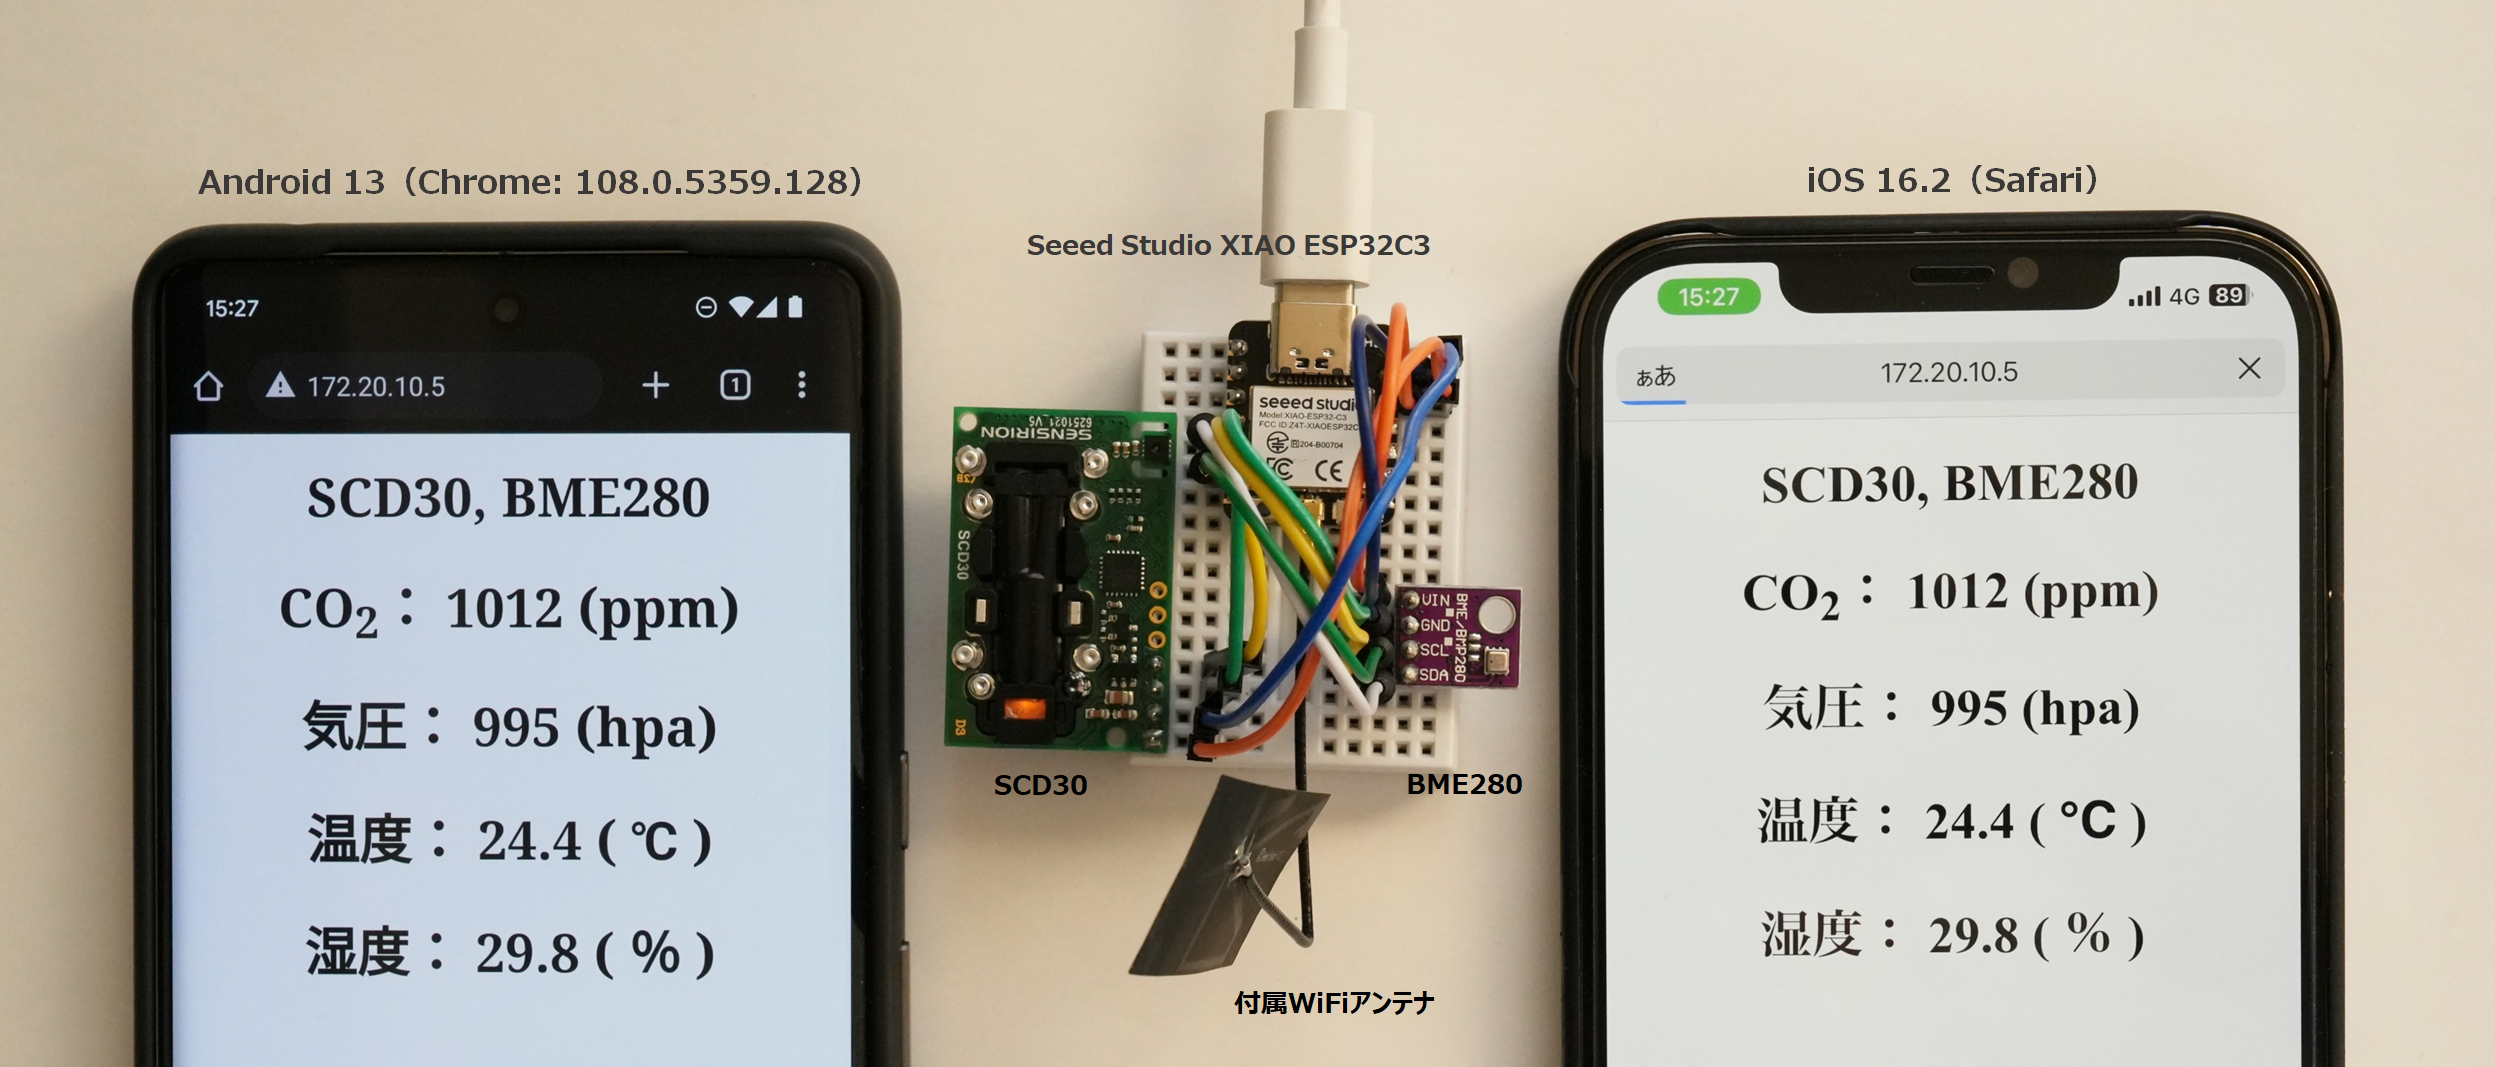
今回、CO2濃度センサ(SCD30やSCD41)の測定値をブラウザ表示するスケッチを加えました。ストーブを焚いているので換気の目安として重宝しています。
準備したパーツ
ネット通販でパーツを集めてブレッドボード上で結線しました。Web(WiFi)サーバはXIAO ESP32C3のWiFi機能を使うソフトウエア処理で実装します。
| # | パーツ | 個数 | 備考 |
| 1 | Seed Studio XIAO ESP32C3 ※ピンヘッダのはんだ付けが必要です。 | 1 | 【M-17454】 |
| 2 | BME280 気圧、温湿度センサ モジュール ※今回使ったモジュールはI2C接続、電圧レギュレータとI2C電圧レベル変換回路(I2Cプルアップ抵抗有)を内蔵 | 1 | 手持ち |
| 3 | CO2センサモジュール(二酸化炭素+温度/湿度センサ) 【SCD30】や【FSNS-SCD41-X00】 | 1 | 手持ち |
| 4 | I2Cプルアップ抵抗 | 適量 | 必要に応じて |
| 5 | 細ピンヘッダ 1×40(黒) | 1 | 【C-06631】 |
| 6 | ミニブレッドボード BB-601(白) | 1 | 【M-15178】 |
| 7 | ジャンパーワイヤ オス-オス 10cmセット | 適量 | 【C-05371】 |
| 8 | USB Type-CのACアダプター ※長期間運用数する際はPCのUSBからの給電に替えて、XIAO ESP32C3への給電用として便利。 | – | 手持ち |
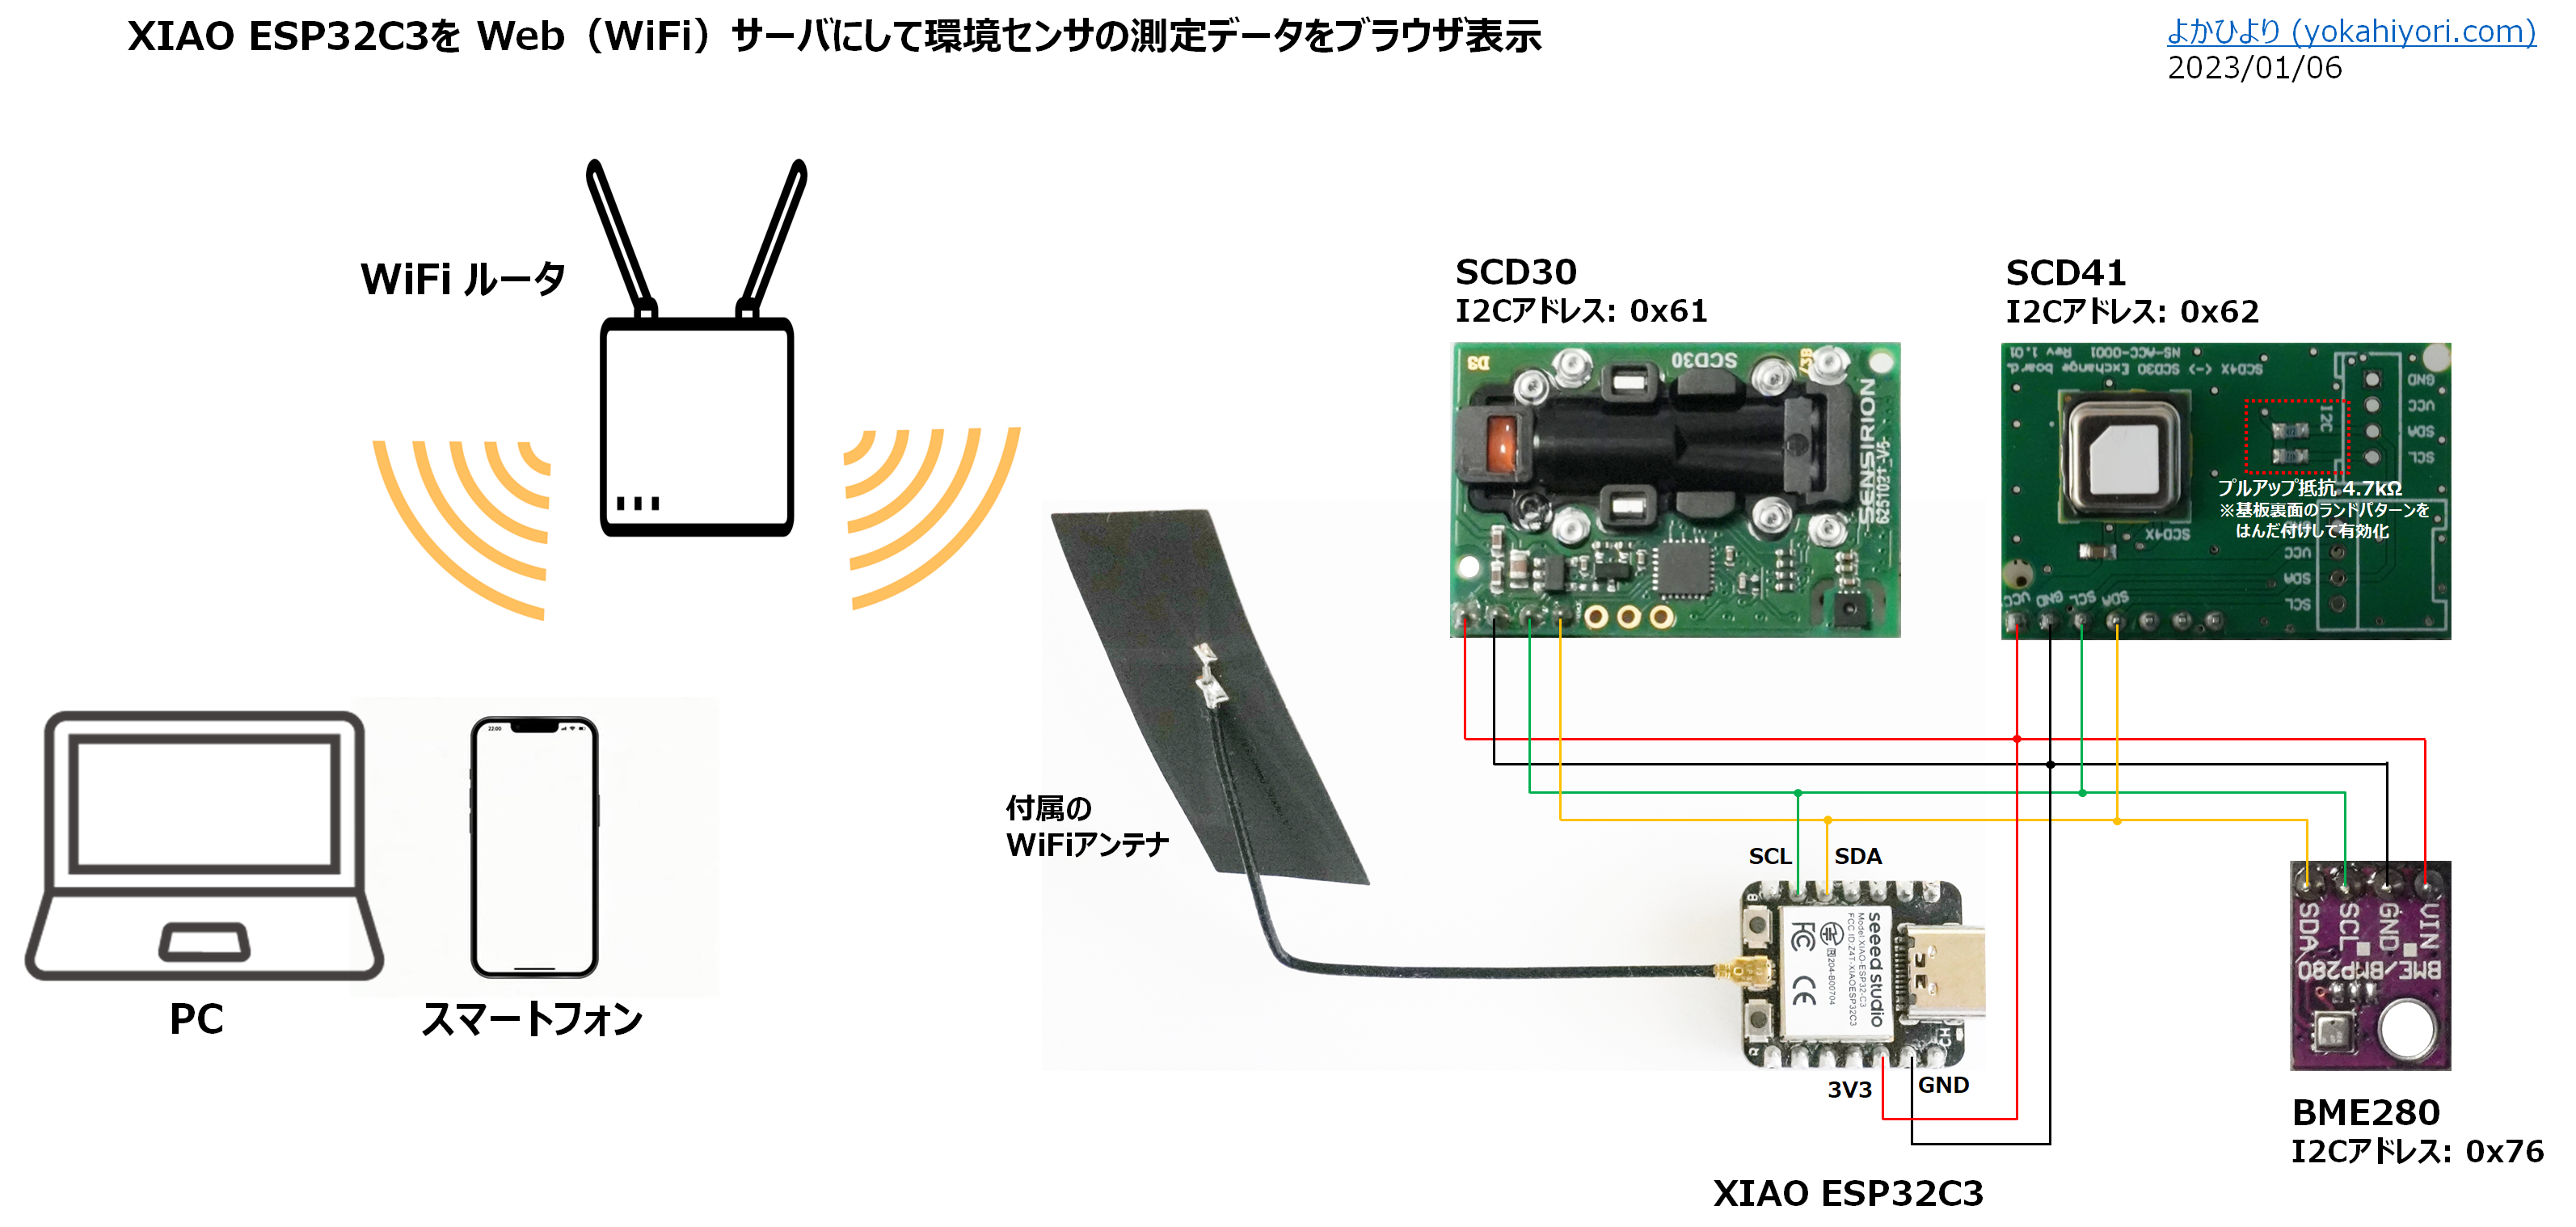
結線図と組立て
XIAO ESP32C3のI2CやSPIのピンレイアウトは下記サイトを参照して結線しました。XIAO ESP32C3には、シート状のWiFiアンテナ(裏面は3M 300LSE両面テープ)がつきます。
Getting Started with Seeed Studio XIAO ESP32C3
https://wiki.seeedstudio.com/XIAO_ESP32C3_Getting_Started/
Pinout diagram
I2C接続のCO2センサモジュールとして手持ちのSCD41とSCD30でテストしました。測定範囲はSCD30が400~10000ppm、SCD41が400~5000ppmです。
参考:
・https://sensirion.com/jp/products/product-catalog/SCD30/
・https://sensirion.com/jp/products/product-catalog/SCD41/
動作確認できた現在の結線図です。動作検証のため、SCD30センサモジュールとSCD41センサモジュールの2つをI2C接続しています。
自宅WiFi環境でXIAO ESP32C3に割り当てられたIPアドレスをWebブラウザのURL欄に http://IPアドレス/ と入力してアクセスします。
開発ツール arduino-esp32のインストールとライブラリの追加
ESP32の開発ツール arduino-esp32を準備してスケッチを作っていきます。
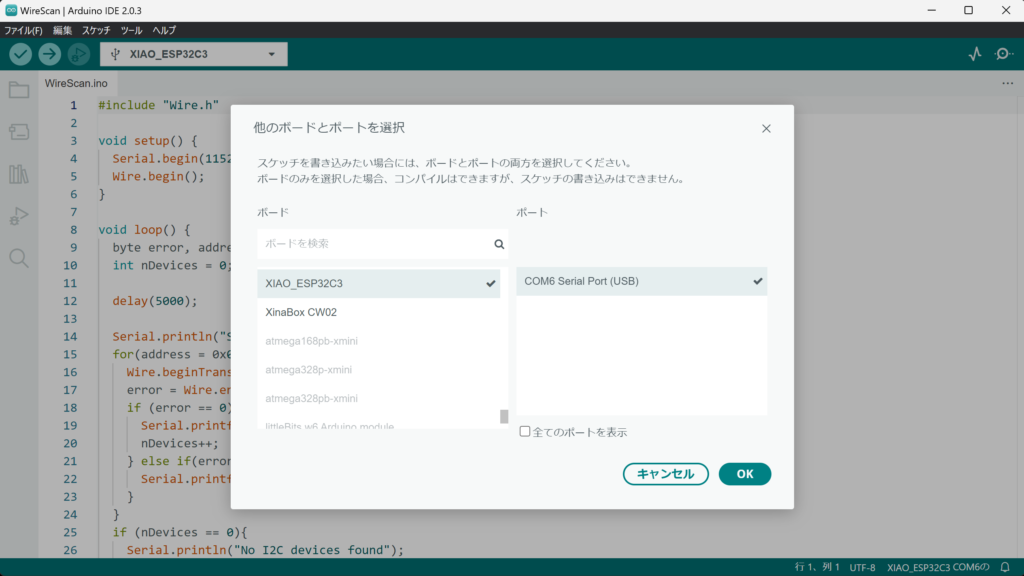
ESP32開発ツール arduino-esp32のインストール
ESP32の開発ツール arduino-esp32を準備してスケッチを作っていきます。XIAO ESP32C3サイトにarduino-esp32のインストール手順の記載があります。
Getting Started with Seeed Studio XIAO ESP32C3
https://wiki.seeedstudio.com/XIAO_ESP32C3_Getting_Started/#software-setup
+ Software setup
当サイトでもESP32-DevKitCを例として、arduino-esp32 をArduino IDE 2.0.x版にインストールする手順メモを纏めました。
ボード(XIAO_ESP32C3を選択)とポート(当サイトのPCではCOM6)を切り替えることでXIAO ESP32C3でもそのまま使えます。
ライブラリのインクルード
先達の方々が開発されたライブラリをインクルードすることでスケッチ作成が容易になります。
BME280センサ
BME280センサ(0x76)から測定データを取得するライブラリとして adafruit/Adafruit_BME280_Library と adafruit/Adafruit_Sensor を利用させていただきました。サイトの「Code」プルダウンから Adafruit_BME280_Library-master.zip と Adafruit_Sensor-master.zip をダウンロード。Arduino IDEのメニュー「スケッチ」–>「ライブラリをインクルード」–>「zip形式のライブラリをインクルード」でダウンロードしたzipファイルを指定します。
SCD30センサとSCD41センサ
SCD30利用時はsparkfun/SparkFun_SCD30_Arduino_Library サイトのライブラリを利用させていただきました。 サイトの「Code」プルダウンから「SparkFun_SCD30_Arduino_Library-main .zip」をダウンロードしてzip形式のライブラリをインクルード」でダウンロードしたzipファイルを指定します。
SCD41利用時はsparkfun/SparkFun_SCD4x_Arduino_Library サイトのライブラリを利用させていただきました。 サイトの「Code」プルダウンから「SparkFun_SCD4x_Arduino_Library-main.zip」をダウンロード。Arduino IDEのメニュー「スケッチ」–>「ライブラリをインクルード」–>「zip形式のライブラリをインクルード」でダウンロードしたzipファイルを指定します。
XIAO ESP32C3を Web(WiFi) Serverにして測定データを送信するスケッチ(2022/01/11更新)
サンプルプログラム「SimpleWiFiServer.ino」( Arduion IDE のメニュー: ファイル —> スケッチ例 —> XIAO ESP32C3のスケッチ例 —> WiFi —> SimpleWiFiServer )を参考にして、測定データをスマートフォンやPCにhtml表示するスケッチを作りました。
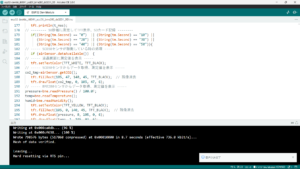
PCとUSB type-Cケーブル接続してArrduino IDEからスケッチを実行するとシリアルモニタにXIAO ESP32C3のIPアドレスが表示されます。クライアント(PCやスマートフォン)からのアクセスがあるとシリアルモニタに情報が表示されます。
Arduion IDE 2.0.xのシリアルモニタは、メニュー: ツール —> シリアルモニタをクリックするか、メニュー上段右端のアイコンをクリックすると、画面の下段に表示されます。
下段の右端上部の「タイムスタンプを表示・非表示」アイコンをクリックして「表示」にしておくと処理の時系列が判りやすいです。

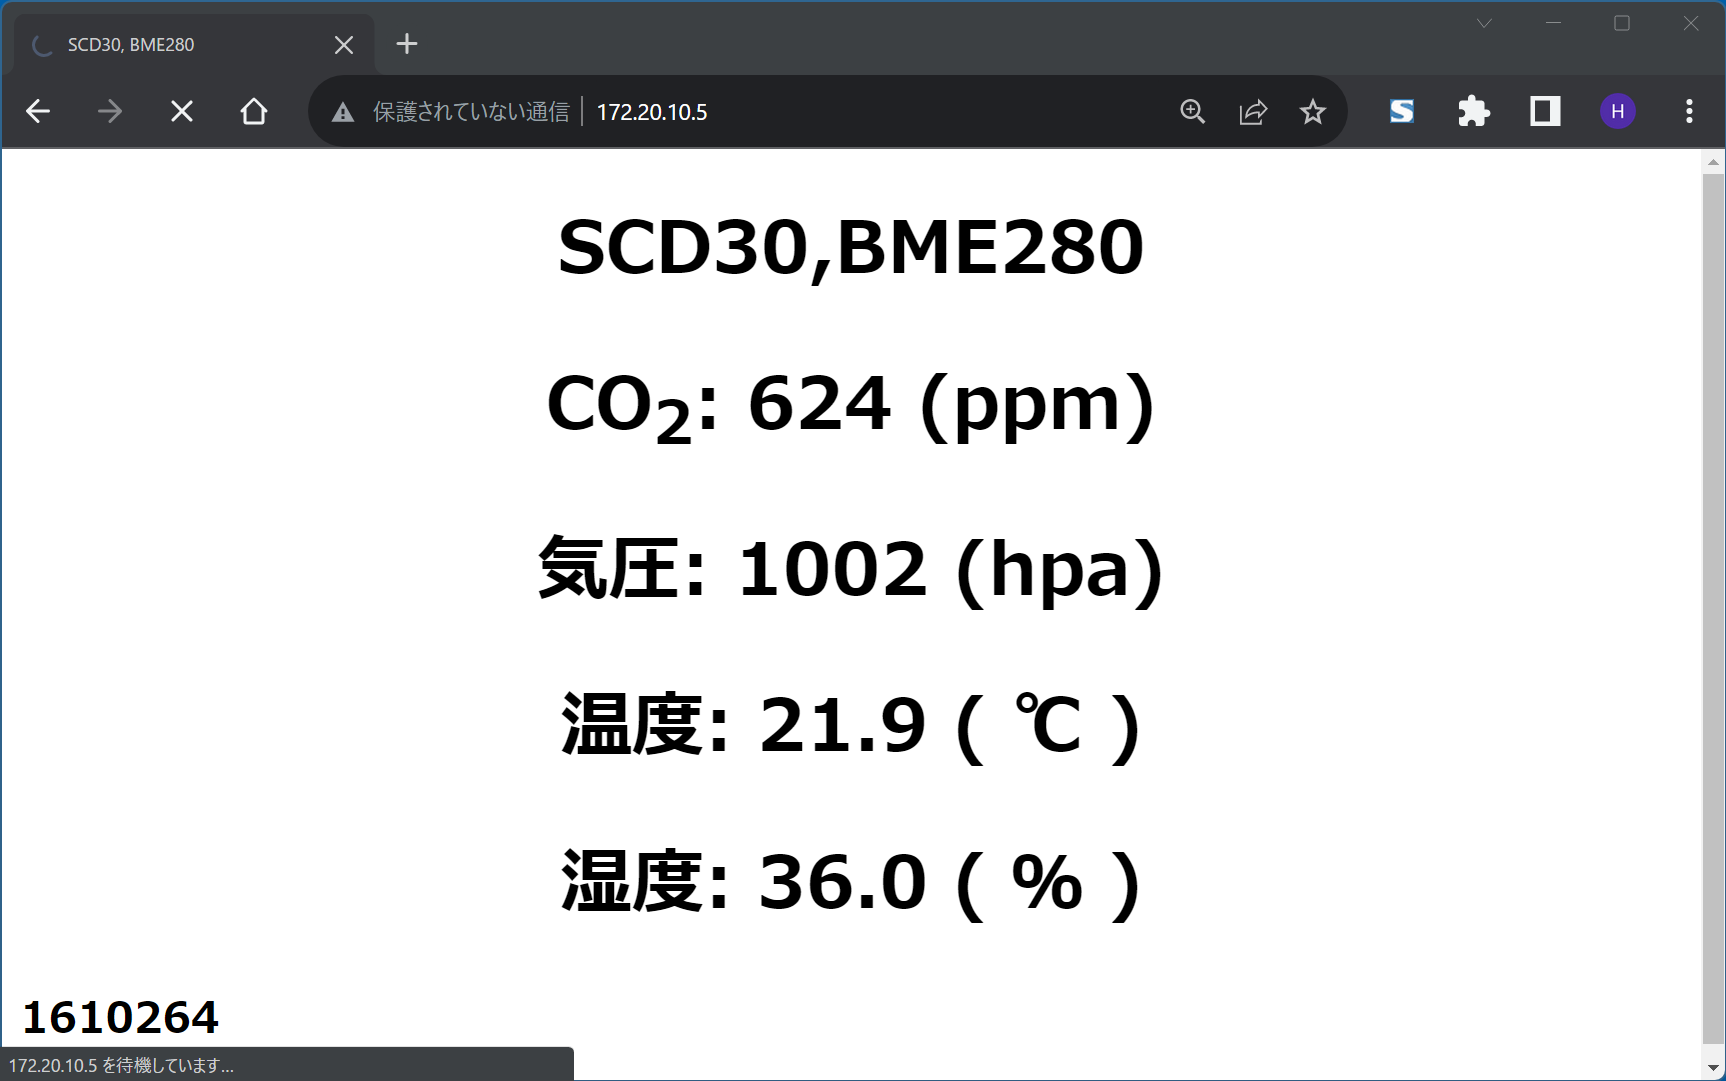
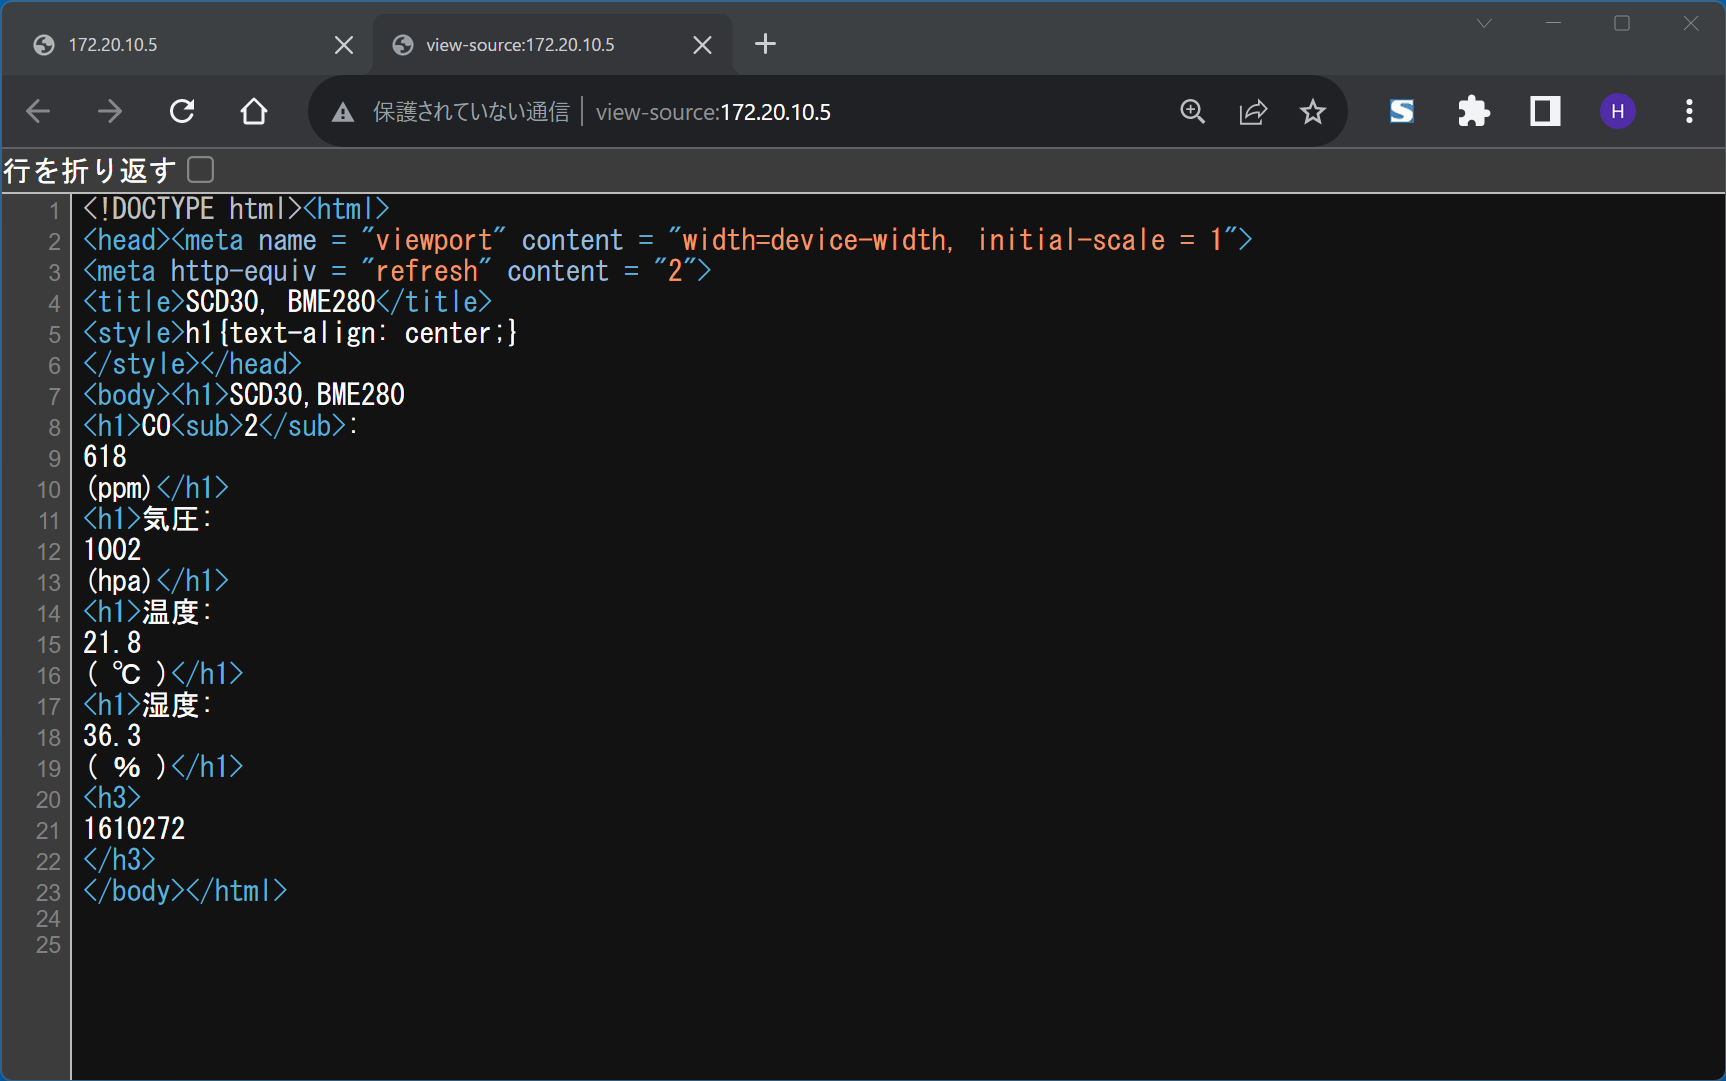
Windows11 Chromeブラウザからアクセスした際の表示画面とソースコード表示のキャプチャです。長時間運用する際は、PCからでなくType-CコネクタのACアダプターからXIAO ESP32C3に給電しています。
スケッチ1:SCD30センサ+BME280
xiao-esp32c3_web-server_bme280_scd30.ino
※ここをクリックするとコード表示を開閉できます。
#include <Wire.h>
#include <Adafruit_Sensor.h>   // https://github.com/adafruit/Adafruit_Sensor
#include <Adafruit_BME280.h>   // https://github.com/adafruit/Adafruit_BME280_Library
#include "SparkFun_SCD30_Arduino_Library.h"  // https://github.com/sparkfun/SparkFun_SCD30_Arduino_Library

#include <WiFi.h>
const char* ssid      = "your ssid";
const char* password  = "your password";

WiFiServer server(80);

SCD30 airSensor;
float co2_tmp;

Adafruit_BME280 bme;
bool status;
float pres;
float temp;
float humi;

int count=0;

void setup() {
  Serial.begin(115200);
//---------WiFi接続
  WiFi.begin(ssid, password);
  while (WiFi.status() != WL_CONNECTED) {
    delay(500);
  }
// IPアドレス確認用
  Serial.print("WiFi IP address: ");
  Serial.println(WiFi.localIP());
//---------WEBサービス開始
  server.begin();
//---------BME280初期化
status = bme.begin(0x76);
while (!status) {
  delay(1000);
  }
//-------SCD30初期化
  if (airSensor.begin() == false) {
    while (1);
    }
//The SCD30 has data ready every two seconds
delay(2000);
}


void loop() {
WiFiClient client = server.available(); // listen for incoming clients
 if (client) {                           // if you get a client,
  Serial.println("New Client.");         // print a message out the serial port
  Serial.println(count);
  String currentLine = "";               // make a String to hold incoming data from the client
  while (client.connected()) {           // loop while the client's connected
    if (client.available()) {            // if there's bytes to read from the client,
     char c = client.read();             // read a byte, then
     Serial.write(c);                    // print it out the serial monitor
     if (c == '\n') {                    // if the byte is a newline character
          // if the current line is blank, you got two newline characters in a row.
          // that's the end of the client HTTP request, so send a response:
        if (currentLine.length() == 0) {
            // HTTP headers always start with a response code (e.g. HTTP/1.1 200 OK)
            // and a content-type so the client knows what's coming, then a blank line:
            client.println("HTTP/1.1 200 OK");
            client.println("Content-type:text/html; charset=utf-8;");
            client.println();
// htmlを表示
 client.println("<!DOCTYPE html><html>");
// 端末画面の幅に合わせる <meta name="viewport" content="width=device-width,initial-scale=1″>
 client.println("<head><meta name = \"viewport\" content = \"width=device-width, initial-scale = 1\">");
// 2秒毎にページをリロード <meta http-equiv="refresh" content="2">
 client.println("<meta http-equiv = \"refresh\" content = \"2\">");
 client.println("<title>SCD30, BME280</title>");
 client.println("<style>h1{text-align: center;}");
 client.println("</style></head>");
// ----- SCD30センサが稼働している時の処理 -----
   if (airSensor.dataAvailable()) {
// SCD30センサからデータ取得 -----
co2_tmp=airSensor.getCO2();
// BME280センサからデータ取得 -----
pres=bme.readPressure() / 100.0F;
temp=bme.readTemperature();
humi=bme.readHumidity();
}
// SCD30, BME280測定データの表示
 client.print("<body>");
 client.println("<h1>SCD30,BME280");
 client.println("<h1>CO<sub>2</sub>: ");
 client.println(co2_tmp, 0);
 client.println("(ppm)</h1>");
 client.println("<h1>気圧: ");
 client.println(pres, 0);
 client.println("(hpa)</h1>");
 client.println("<h1>温度: ");
 client.println(temp, 1);
 client.println("( ℃ )</h1>");
 client.println("<h1>湿度: ");
 client.println(humi, 1);
 client.println("( % )</h1>");
 client.println("<h3>");
 client.println(count);
 client.println("</h3>");
 client.println("</body></html>");
            // The HTTP response ends with another blank line:
            client.println();
            // break out of the while loop:
            break;
          } else {    // if you got a newline, then clear currentLine:
            currentLine = "";
          }
        } else if (c != '\r') {  // if you got anything else but a carriage return character,
          currentLine += c;      // add it to the end of the currentLine
        }
      }
    }
    // close the connection:
    client.stop();
    Serial.println("Client Disconnected.");
  }
count++;
delay(2000);
}
スケッチ2:SCD41センサ+BME280
xiao-esp32c3_web-server_bme280_scd41.ino
※ここをクリックするとコード表示を開閉できます。
#include <Wire.h>
#include <Adafruit_Sensor.h>   // https://github.com/adafruit/Adafruit_Sensor
#include <Adafruit_BME280.h>   // https://github.com/adafruit/Adafruit_BME280_Library
#include "SparkFun_SCD4x_Arduino_Library.h"  // https://github.com/sparkfun/SparkFun_SCD4x_Arduino_Library

#include <WiFi.h>
const char* ssid      = "your ssid";
const char* password  = "your password";

WiFiServer server(80);

SCD4x mySensor;
float co2_41x;

Adafruit_BME280 bme;
bool status;
float pres;
float temp;
float humi;

int count=0;

void setup() {
  Serial.begin(115200);
//---------WiFi接続
  WiFi.begin(ssid, password);
  while (WiFi.status() != WL_CONNECTED) {
    delay(500);
  }
// IPアドレス確認用
  Serial.println("WiFi IP address: ");
  Serial.println(WiFi.localIP());
//---------WEBサービス開始
  server.begin();
//---------BME280初期化
status = bme.begin(0x76);
while (!status) {
  delay(1000);
  }
//-------SCD41初期化
  if (mySensor.begin() == false)  {
    while (1);
    }
//The SCD41 has data ready every five seconds
delay(4000);
}


void loop() {
 WiFiClient client = server.available(); // listen for incoming clients
 if (client) {                           // if you get a client,
  Serial.println("New Client.");         // print a message out the serial port
  Serial.println(count);
  String currentLine = "";               // make a String to hold incoming data from the client
  while (client.connected()) {           // loop while the client's connected
    if (client.available()) {            // if there's bytes to read from the client,
     char c = client.read();             // read a byte, then
     Serial.write(c);                    // print it out the serial monitor
     if (c == '\n') {                    // if the byte is a newline character
          // if the current line is blank, you got two newline characters in a row.
          // that's the end of the client HTTP request, so send a response:
        if (currentLine.length() == 0) {
            // HTTP headers always start with a response code (e.g. HTTP/1.1 200 OK)
            // and a content-type so the client knows what's coming, then a blank line:
            client.println("HTTP/1.1 200 OK");
            client.println("Content-type:text/html; charset=utf-8;");
            client.println();
// htmlを表示
 client.println("<!DOCTYPE html><html>");
// 端末画面の幅に合わせる <meta name="viewport" content="width=device-width,initial-scale=1″>
 client.println("<head><meta name = \"viewport\" content = \"width=device-width, initial-scale = 1\">");
// 2秒毎にページをリロード <meta http-equiv="refresh" content="2">
 client.println("<meta http-equiv = \"refresh\" content = \"2\">");
 client.println("<title>SCD41, BME280</title>");
 client.println("<style>h1{text-align: center;}");
 client.println("</style></head>");
// ----- SCD41センサが稼働している時の処理 -----
  if (mySensor.readMeasurement())  {
// ----- SCD41センサからデータ取得、測定値をTFT表示 -----
co2_41x=mySensor.getCO2();
// BME280センサからデータ取得 -----
pres=bme.readPressure() / 100.0F;
temp=bme.readTemperature();
humi=bme.readHumidity();
}
// SCD41, BME280測定データの表示
 client.println("<body><h1>SCD41, BME280</h1>");
 client.println("<h1>CO<sub>2</sub>: ");
 client.println(co2_41x, 0);
 client.println("(ppm)</h1>");
 client.println("<h1>気圧: ");
 client.println(pres, 0);
 client.println("(hpa)</h1>");
 client.println("<h1>温度: ");
 client.println(temp, 1);
 client.println("( ℃ )</h1>");
 client.println("<h1>湿度: ");
 client.println(humi, 1);
 client.println("( % )</h1>");
 client.println("<h3>");
 client.println(count);
 client.println("</h3>");
 client.println("</body></html>");
            // The HTTP response ends with another blank line:
            client.println();
            // break out of the while loop:
            break;
          } else {    // if you got a newline, then clear currentLine:
            currentLine = "";
          }
        } else if (c != '\r') {  // if you got anything else but a carriage return character,
          currentLine += c;      // add it to the end of the currentLine
        }
      }
    }
    // close the connection:
    client.stop();
    Serial.println("Client Disconnected.");
  }
count++;
delay(2000);
}