#include <Wire.h>
#include <Adafruit_Sensor.h> // https://github.com/adafruit/Adafruit_Sensor
#include <Adafruit_BME280.h> // https://github.com/adafruit/Adafruit_BME280_Library
#include "SparkFun_SCD30_Arduino_Library.h" // https://github.com/sparkfun/SparkFun_SCD30_Arduino_Library
#include <ST7032.h> // https://github.com/tomozh/arduino_ST7032
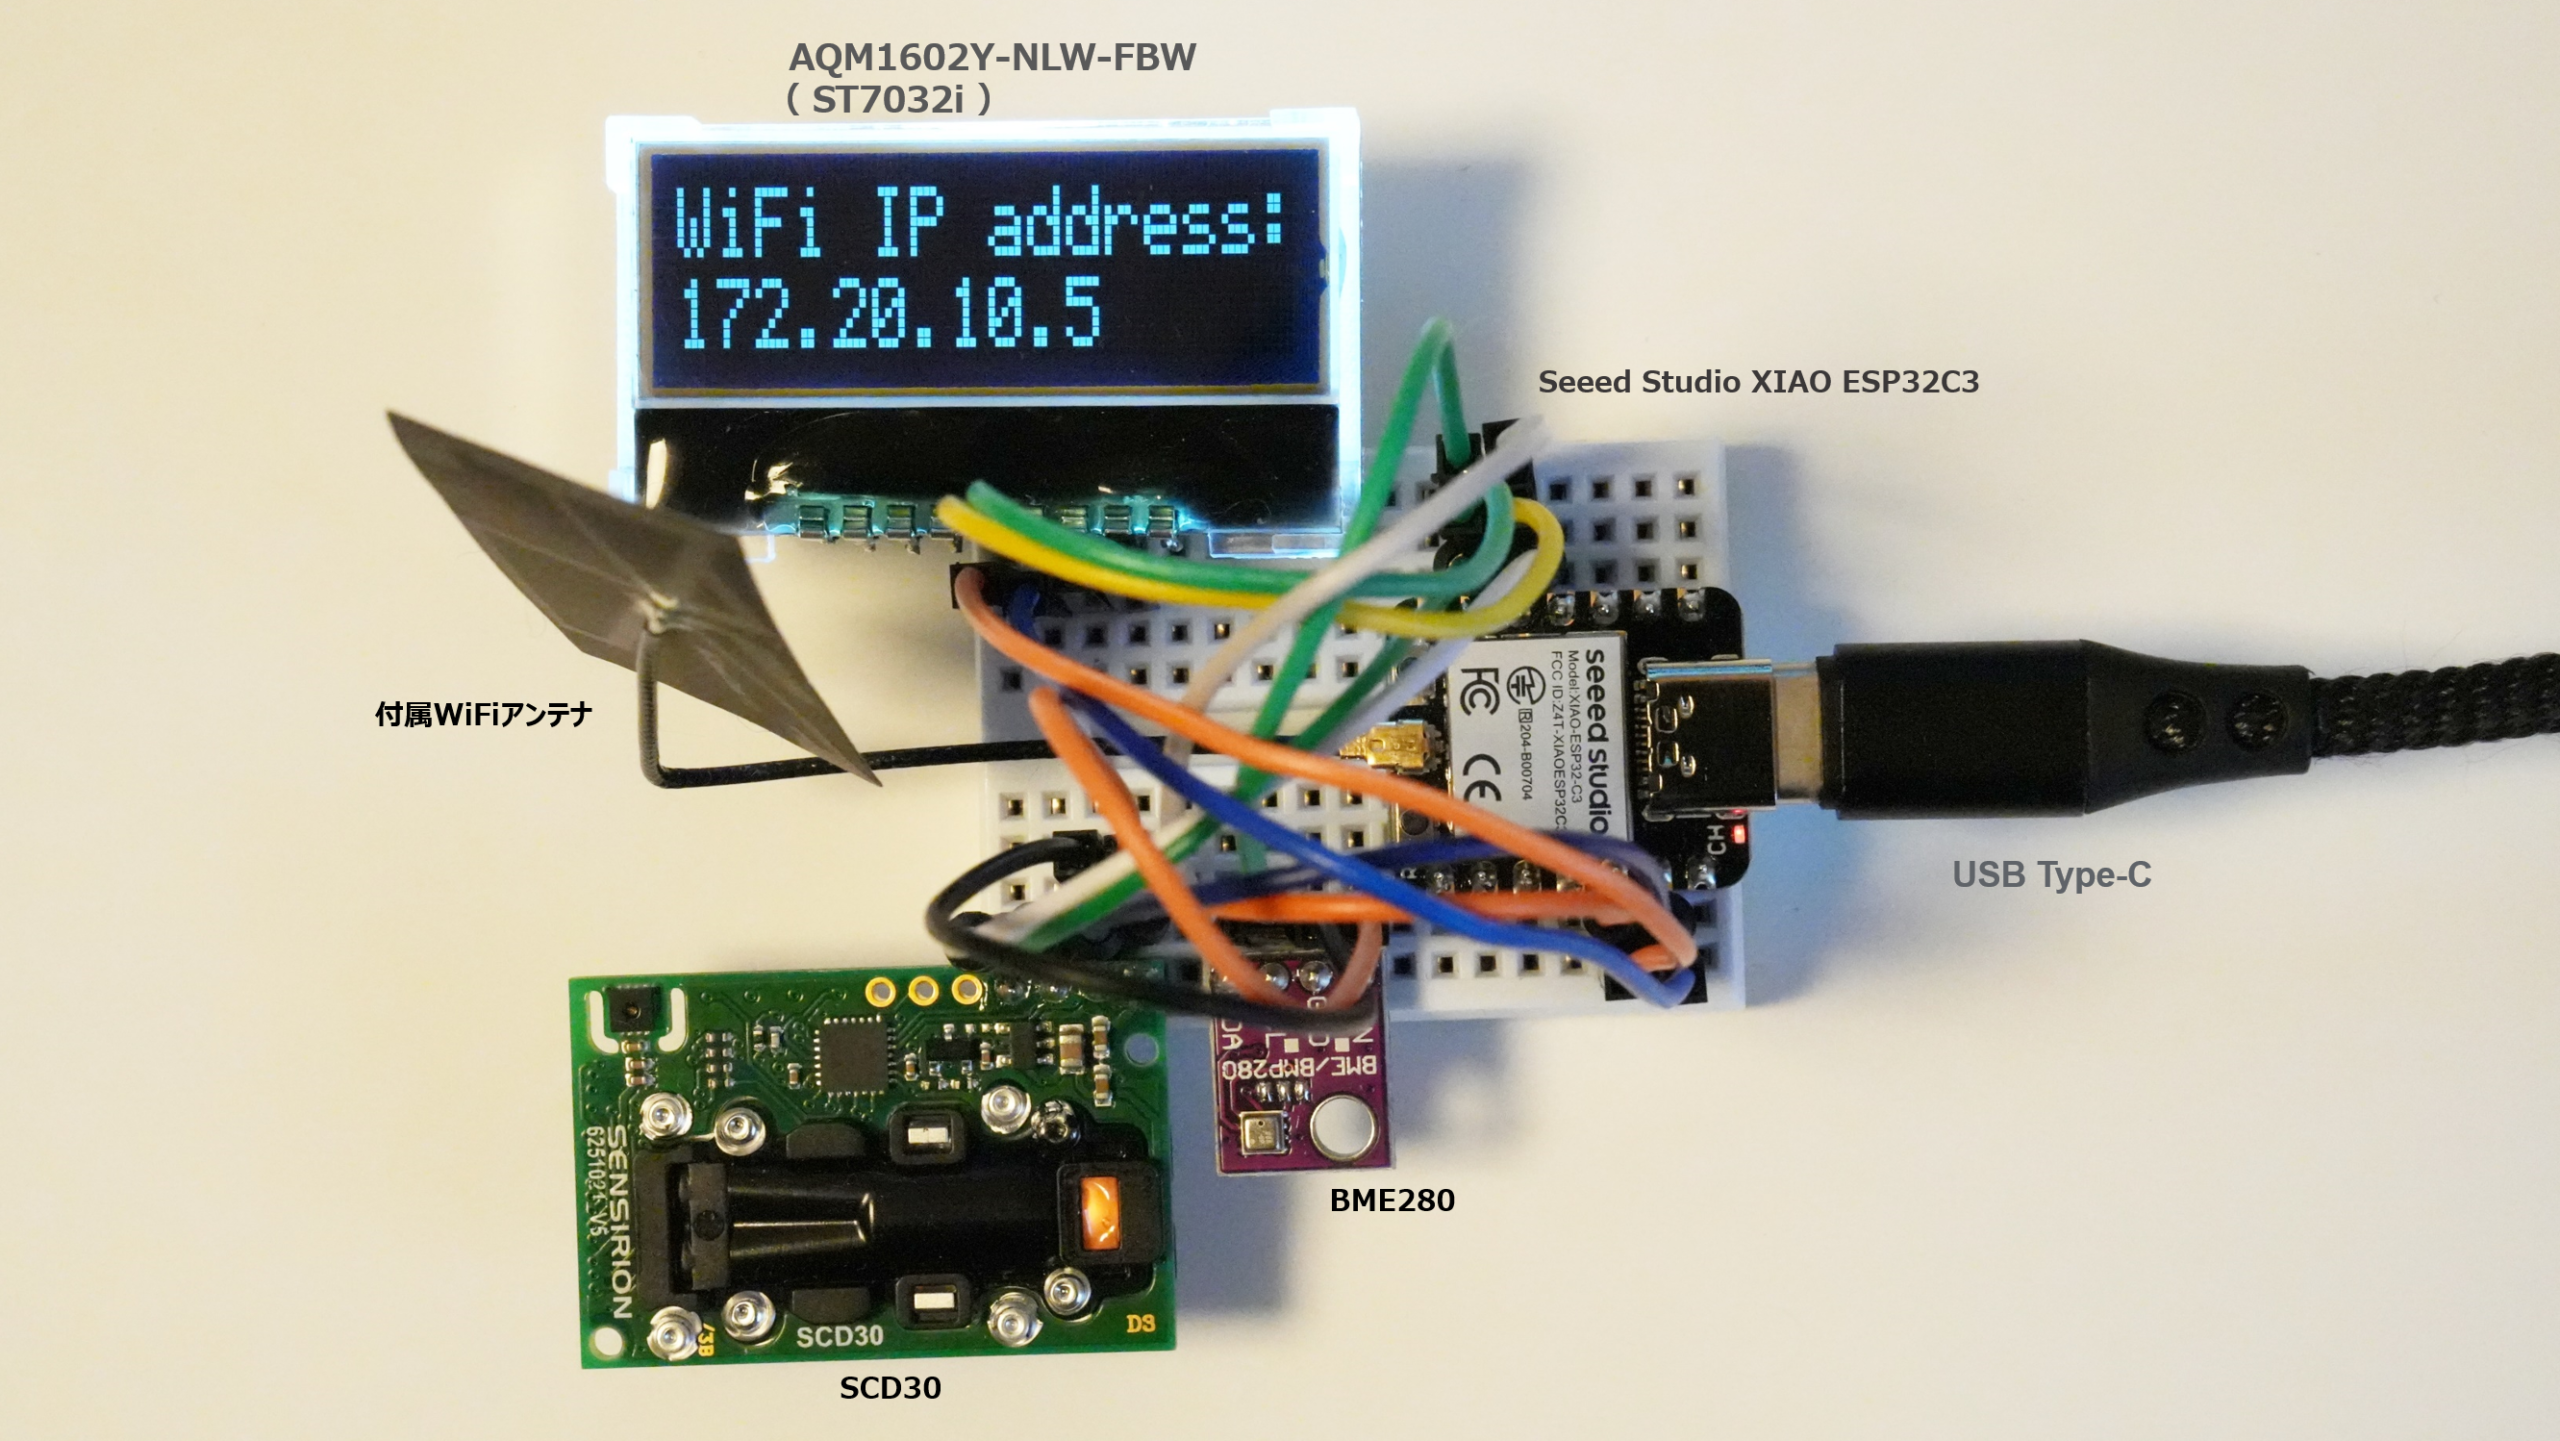
ST7032 lcd;
#include <WiFi.h>
const char* ssid = "your ssid";
const char* password = "your password";
WiFiServer server(80);
SCD30 airSensor;
float co2_tmp;
Adafruit_BME280 bme;
bool status;
float pres;
float temp;
float humi;
int count=0;
void setup() {
Serial.begin(115200);
Wire.begin(); // I2C初期化
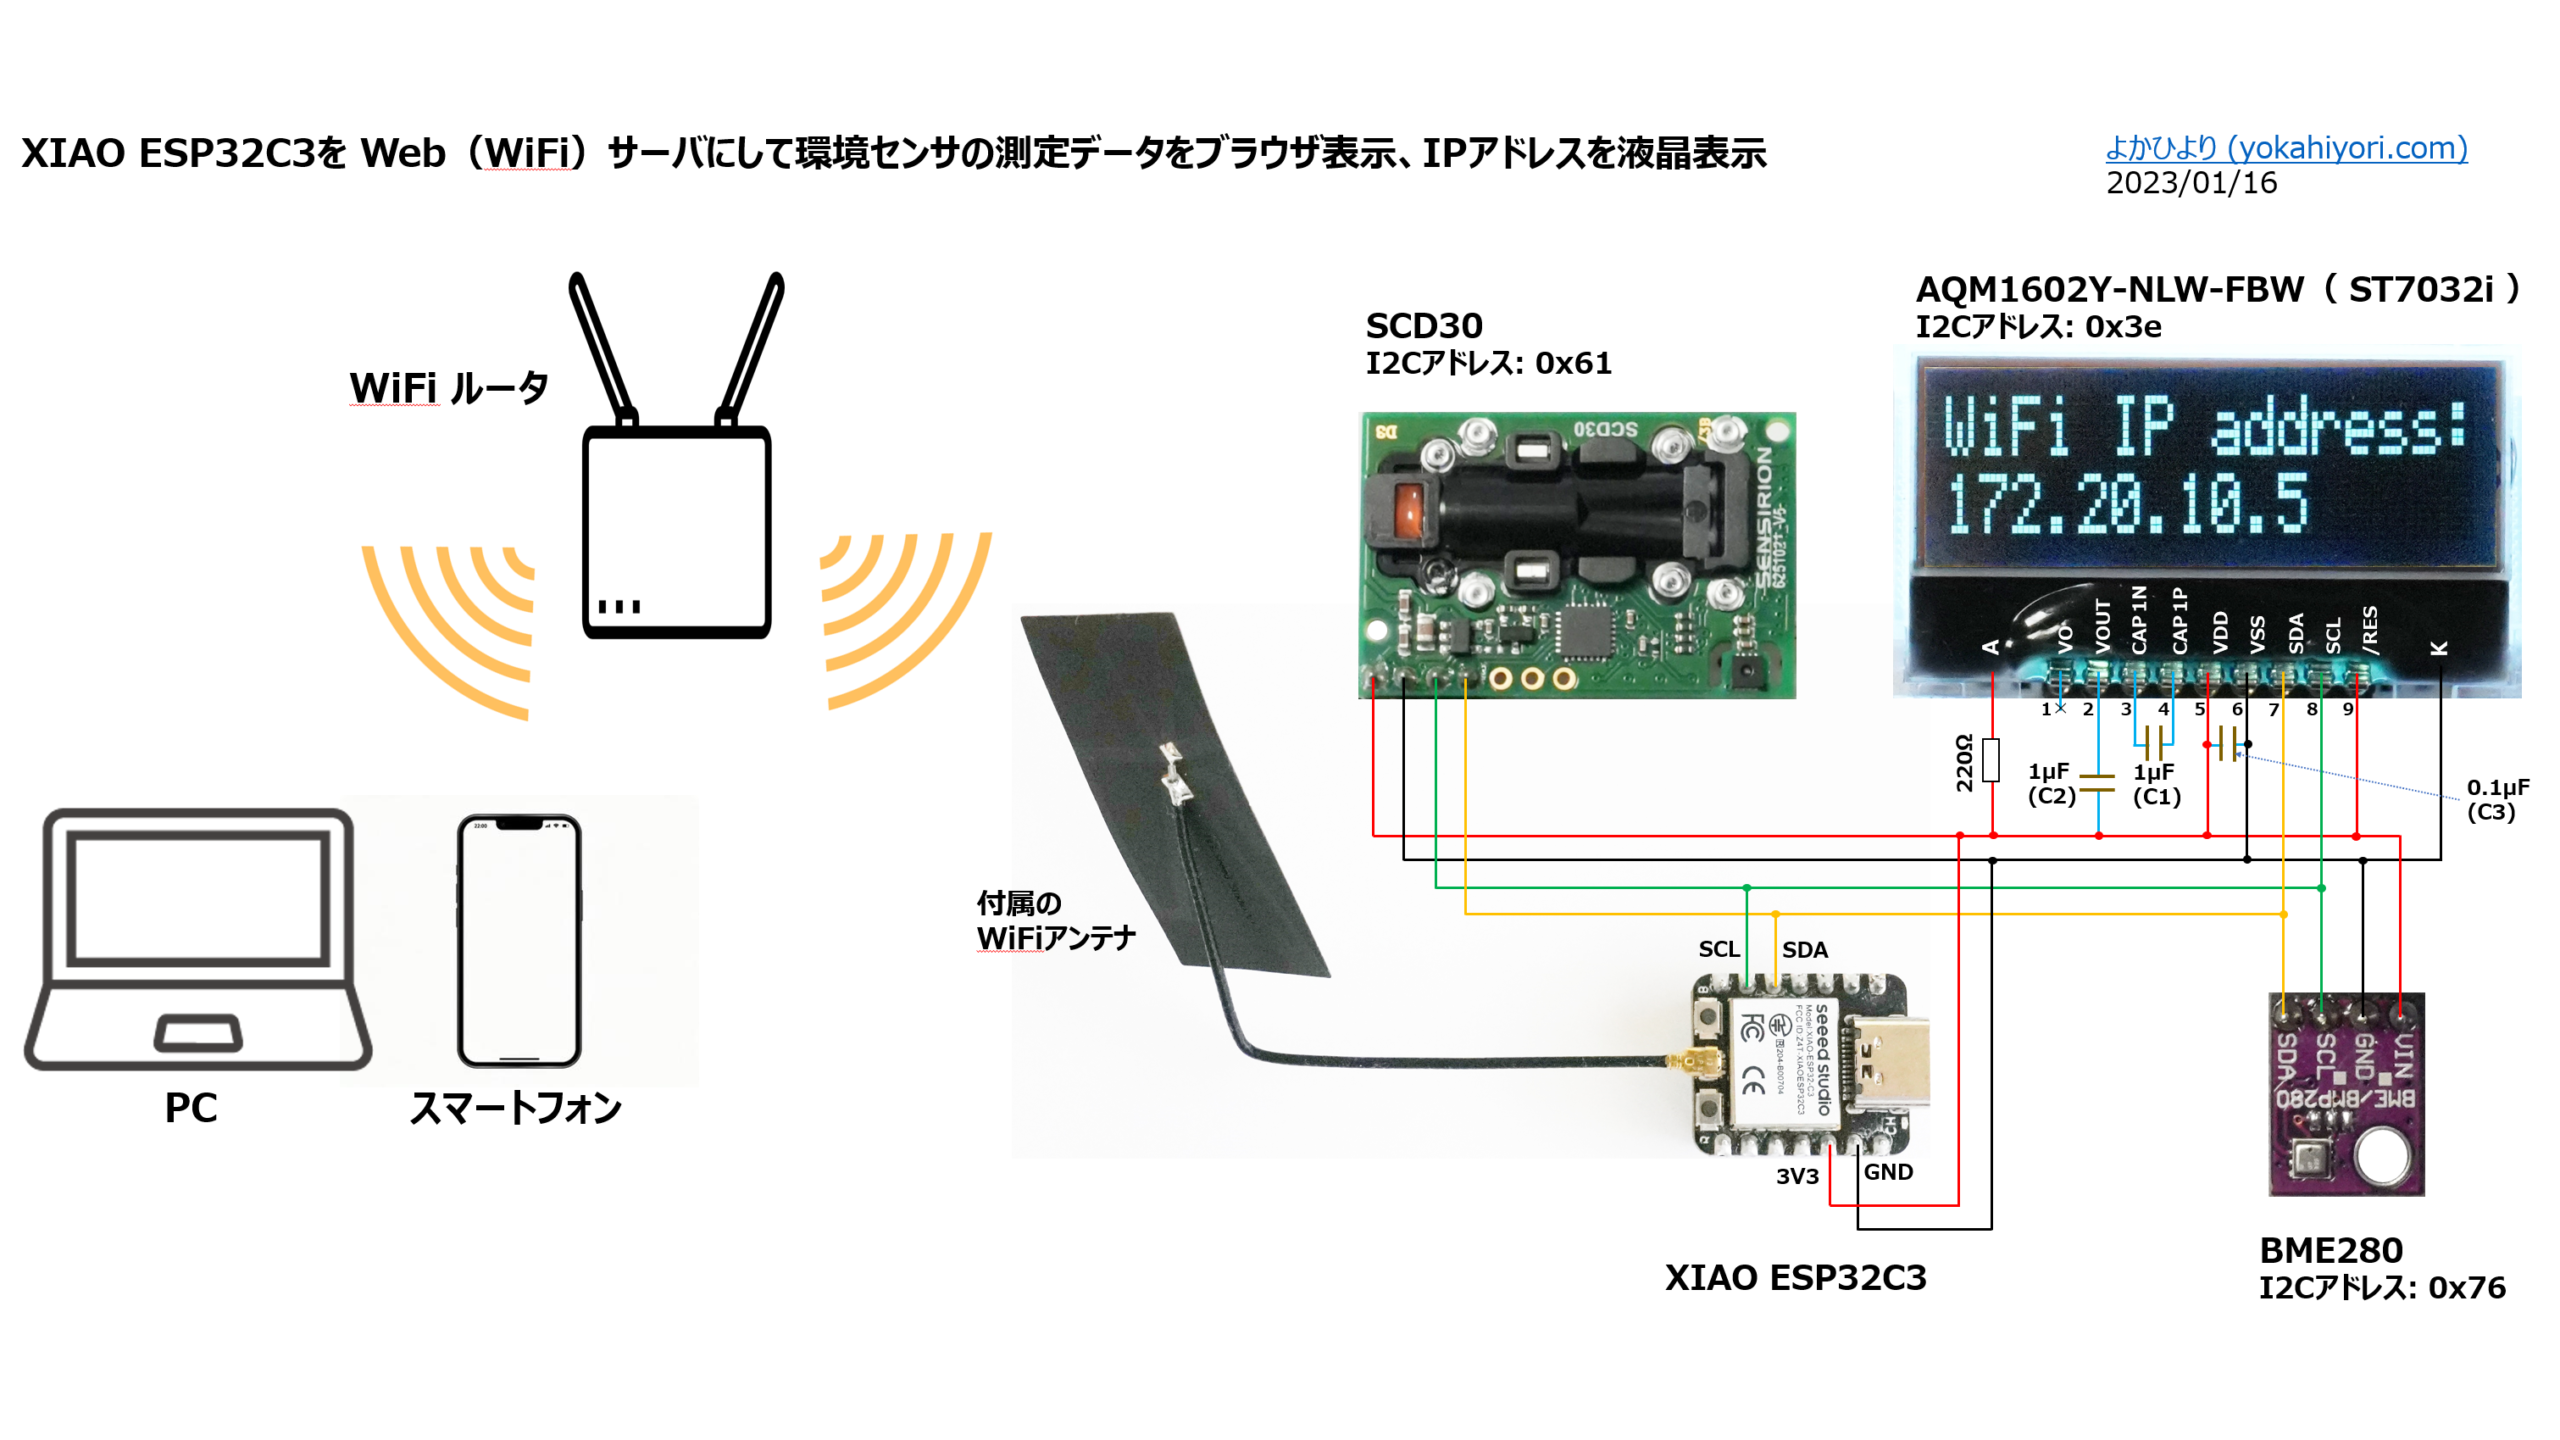
lcd.begin(16, 2); // ディスプレイの文字数(16)と行数(2)
lcd.setContrast(40); // ディスプレイのコントラスト調整(0~63の範囲で調整)
//---------WiFi接続
WiFi.begin(ssid, password);
while (WiFi.status() != WL_CONNECTED) {
delay(500);
}
// IPアドレス:シリアルモニタ確認用
Serial.print("WiFi IP address: ");
Serial.println(WiFi.localIP());
// IPアドレス:液晶表示
lcd.setCursor(0, 0);
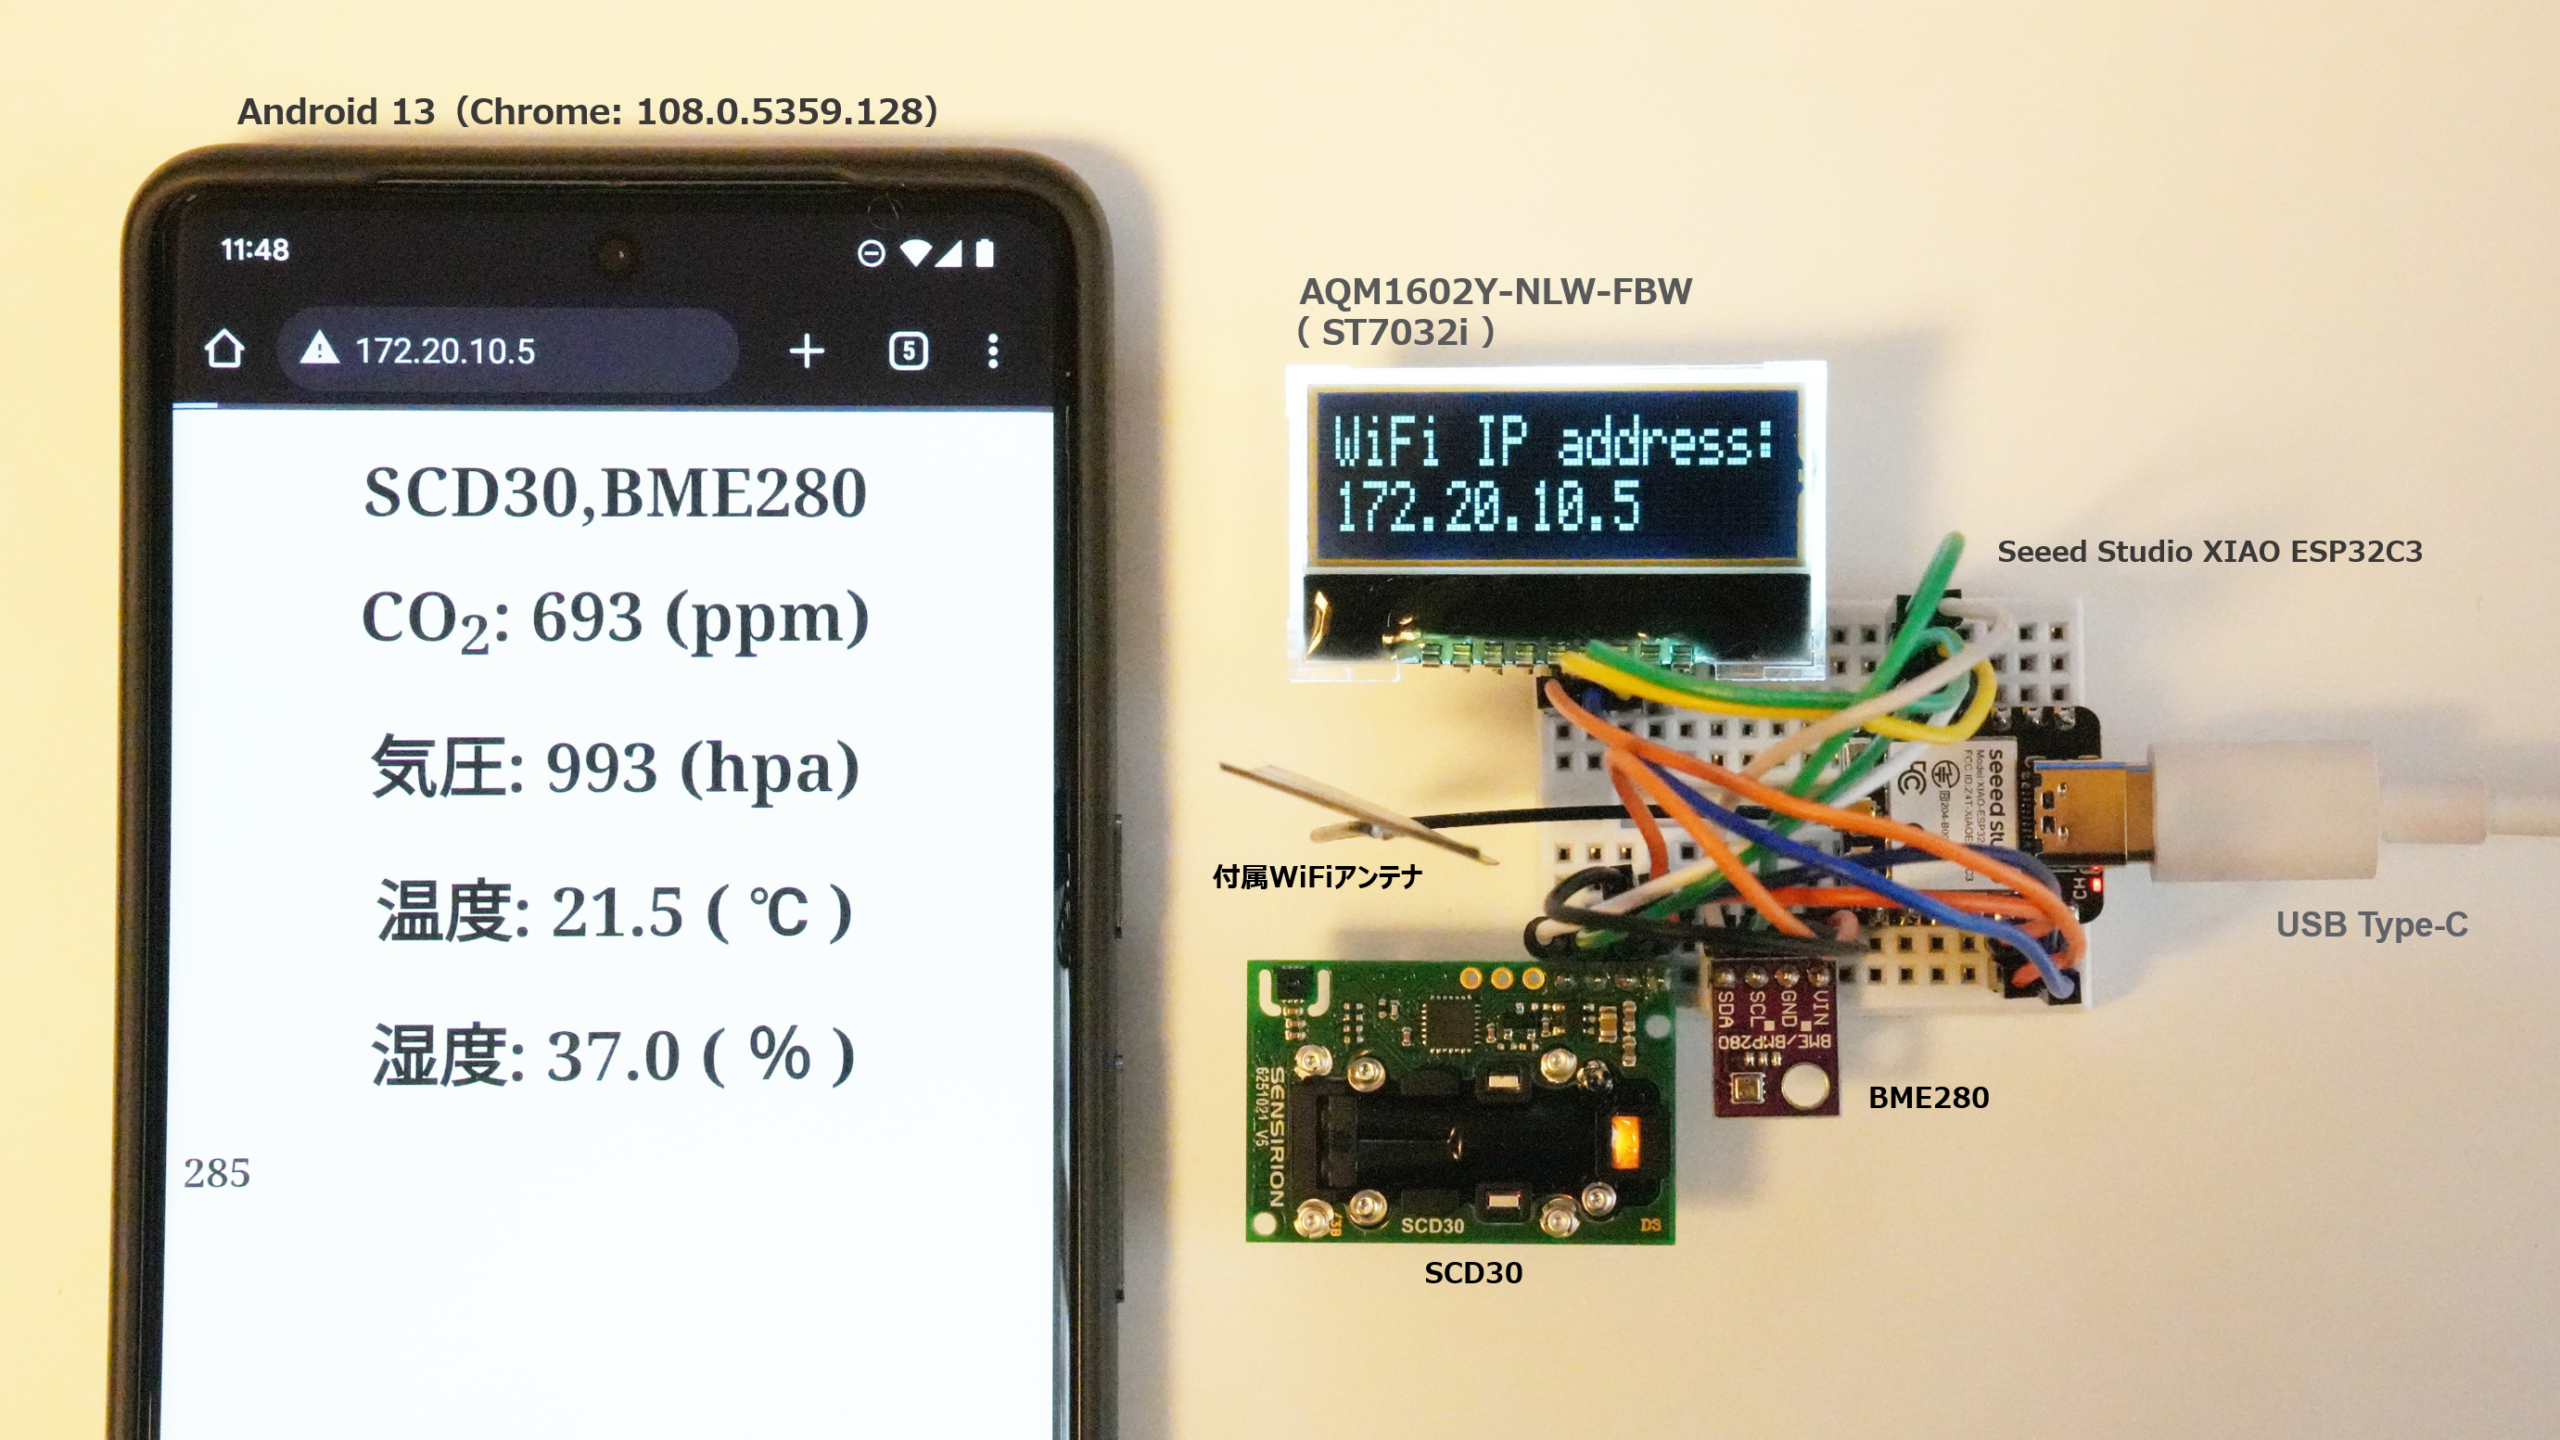
lcd.print("WiFi IP address:");
lcd.setCursor(0, 1);
lcd.print(WiFi.localIP());
//-------WEBサービス開始
server.begin();
//-------BME280初期化
status = bme.begin(0x76);
while (!status) {
delay(1000);
}
//-------SCD30初期化
if (airSensor.begin() == false) {
while (1);
}
//The SCD30 has data ready every two seconds
delay(2000);
}
void loop() {
WiFiClient client = server.available(); // listen for incoming clients
if (client) { // if you get a client,
Serial.println("New Client."); // print a message out the serial port
Serial.println(count);
String currentLine = ""; // make a String to hold incoming data from the client
while (client.connected()) { // loop while the client's connected
if (client.available()) { // if there's bytes to read from the client,
char c = client.read(); // read a byte, then
Serial.write(c); // print it out the serial monitor
if (c == '\n') { // if the byte is a newline character
// if the current line is blank, you got two newline characters in a row.
// that's the end of the client HTTP request, so send a response:
if (currentLine.length() == 0) {
// HTTP headers always start with a response code (e.g. HTTP/1.1 200 OK)
// and a content-type so the client knows what's coming, then a blank line:
client.println("HTTP/1.1 200 OK");
client.println("Content-type:text/html; charset=utf-8;");
client.println();
// htmlを表示
client.println("<!DOCTYPE html><html>");
// 端末画面の幅に合わせる <meta name="viewport" content="width=device-width,initial-scale=1″>
client.println("<head><meta name = \"viewport\" content = \"width=device-width, initial-scale = 1\">");
// 2秒毎にページをリロード <meta http-equiv="refresh" content="2">
client.println("<meta http-equiv = \"refresh\" content = \"2\">");
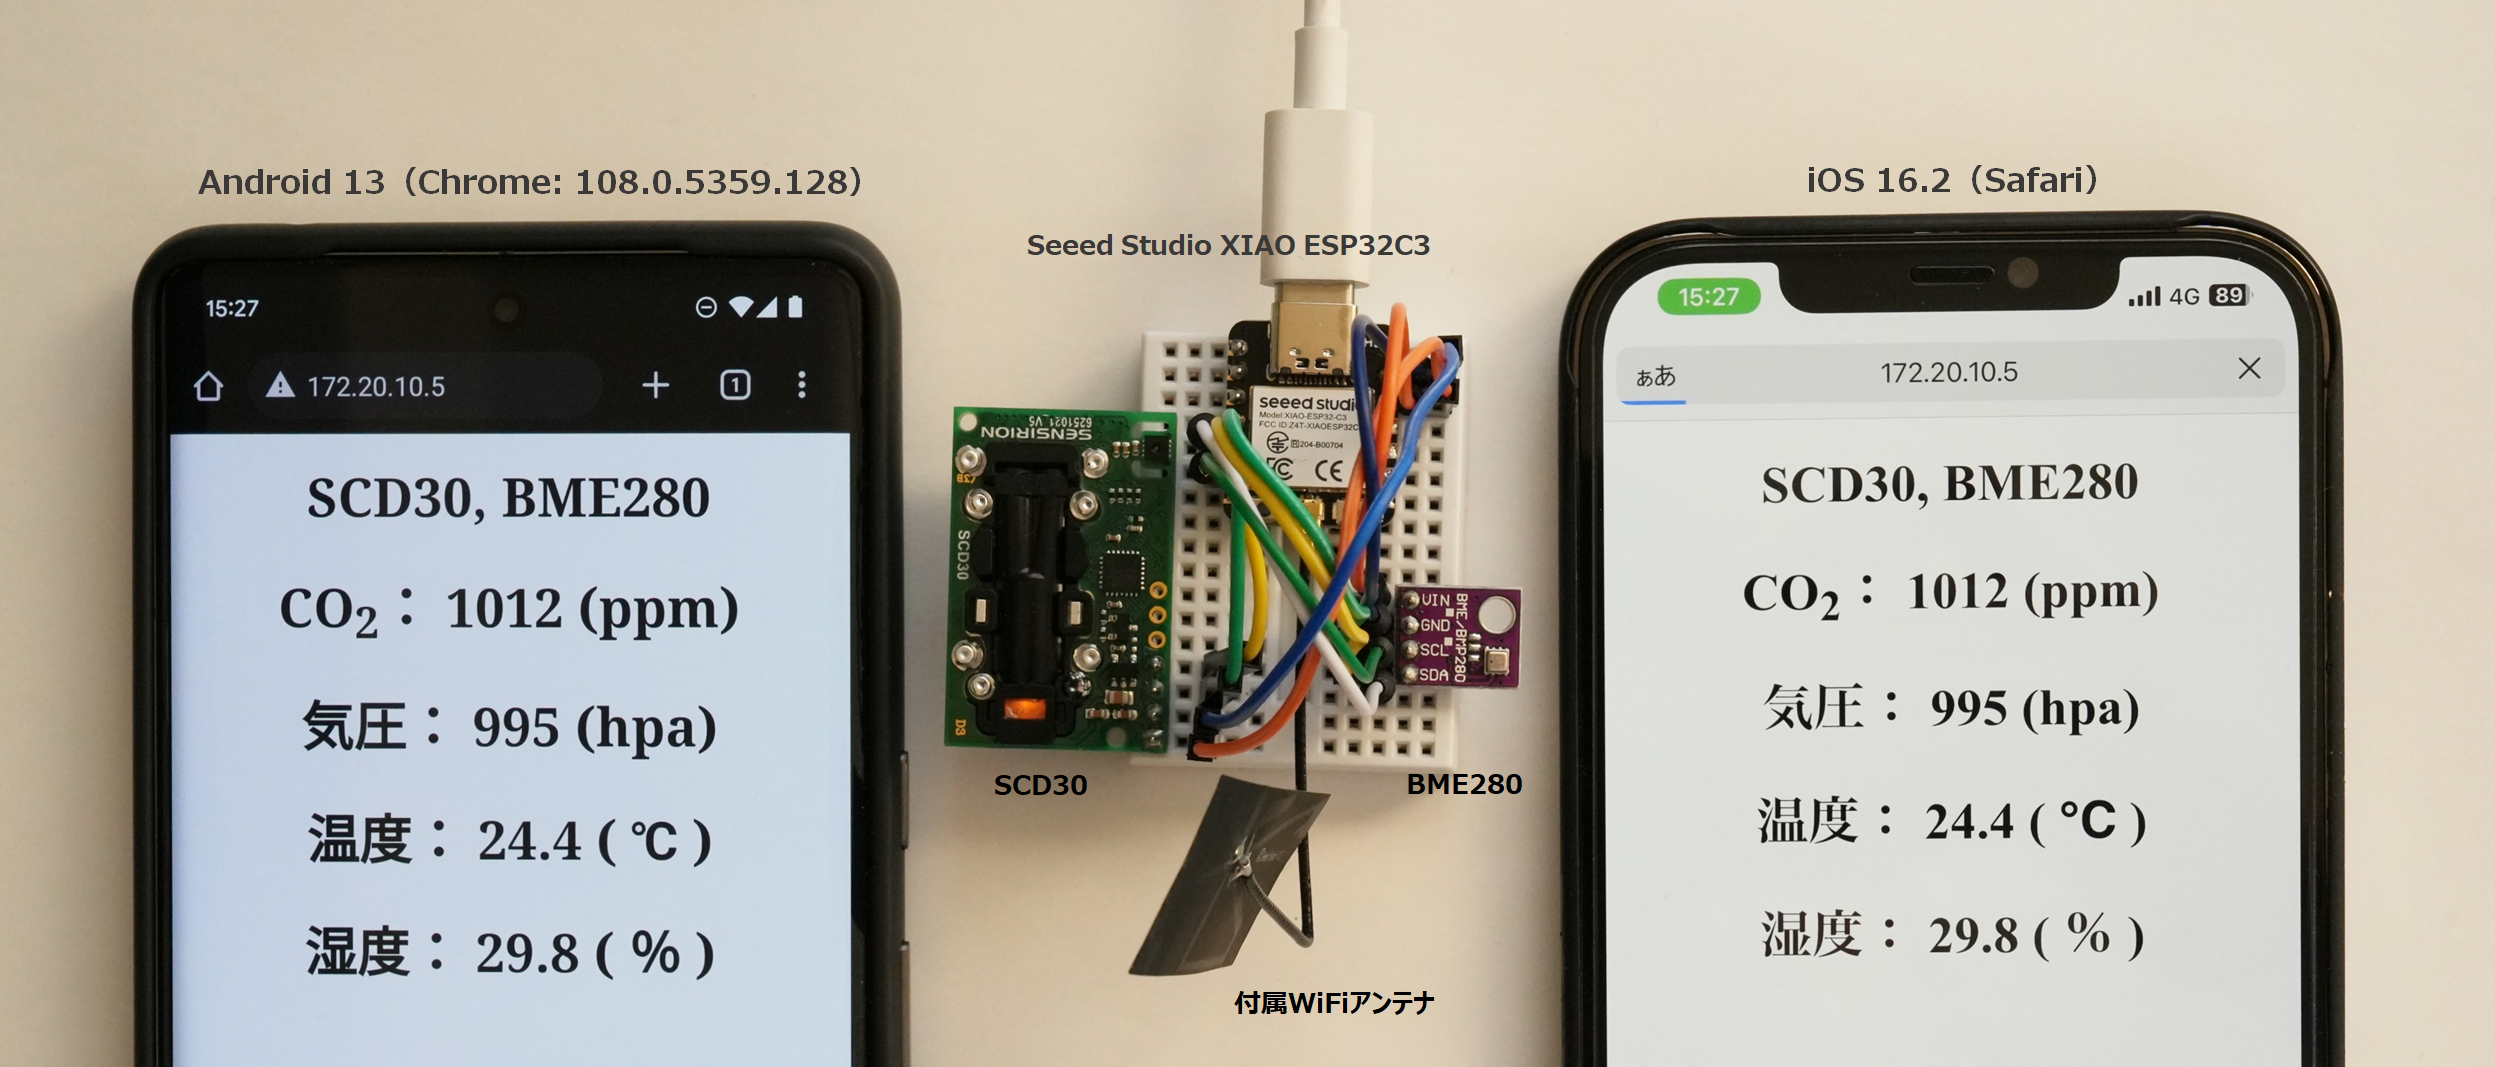
client.println("<title>SCD30, BME280</title>");
client.println("<style>h1{text-align: center;}");
client.println("</style></head>");
// ----- SCD30センサが稼働している時の処理 -----
if (airSensor.dataAvailable()) {
// SCD30センサからデータ取得 -----
co2_tmp=airSensor.getCO2();
// BME280センサからデータ取得 -----
pres=bme.readPressure() / 100.0F;
temp=bme.readTemperature();
humi=bme.readHumidity();
}
// SCD30, BME280測定データの表示
client.print("<body>");
client.println("<h1>SCD30,BME280");
client.println("<h1>CO<sub>2</sub>: ");
client.println(co2_tmp, 0);
client.println("(ppm)</h1>");
client.println("<h1>気圧: ");
client.println(pres, 0);
client.println("(hpa)</h1>");
client.println("<h1>温度: ");
client.println(temp, 1);
client.println("( ℃ )</h1>");
client.println("<h1>湿度: ");
client.println(humi, 1);
client.println("( % )</h1>");
client.println("<h3>");
client.println(count);
client.println("</h3>");
client.println("</body></html>");
// The HTTP response ends with another blank line:
client.println();
// break out of the while loop:
break;
} else { // if you got a newline, then clear currentLine:
currentLine = "";
}
} else if (c != '\r') { // if you got anything else but a carriage return character,
currentLine += c; // add it to the end of the currentLine
}
}
}
// close the connection:
client.stop();
Serial.println("Client Disconnected.");
}
count++;
delay(2000);
}